
Animated track objects tutorial
February 16, 2020Hi guys! Some of you probably saw my video where I presented some moving stuff on track. These new Shader patch features add another level of immersion to Assetto Corsa but they lack proper documentation for now. So I decided to share my knowledge and show you how did I manage to make stuff move.
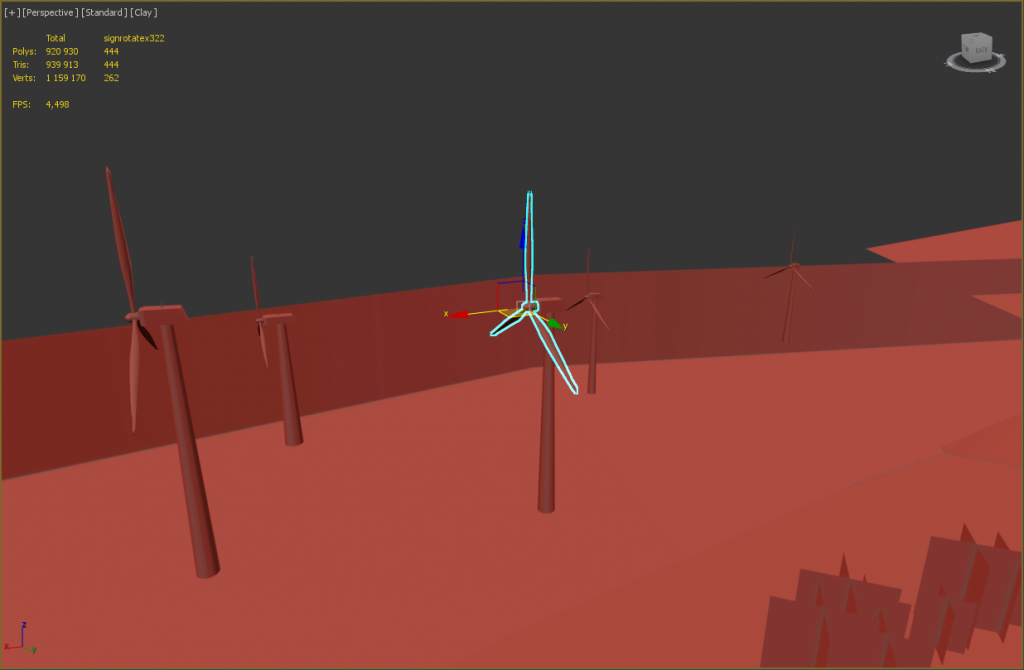
Animated windmill
To animate a windmill on track is quite simple, all you need is some editor like Notepad. However there are some conditions to make it work:
- windmill blades or airscrews should be separete objects with properly aligned pivot point (local coordinates) – in the middle
- you have to be able to learn XYZ coordinates of the point in which will the blades rotate (in 3D editor or with help of the CSP apps)
All you need to do is to add this code to your CSP config file:
[WRAP_MESHES_...]
NAME = name_of_your_node
MESHES = name_of_rotating_mesh
PIVOT_POS = -76.42, 170.709, 889.468

[ANIMATED_...]
NODE = name_of_your_node
WINDMILL_DIR = 0, 0, 1
WINDMILL_DIR_EXP = 0.5
WINDMILL_DIR_BOTH_SIDES = 1
SPIN_AXIS = 0, 0, 1
SPEED_MULT = 1
WIND_SPEED_KMH_MIN = 1
WIND_SPEED_KMH_MAX = 20
WIND_SPEED_KMH_STOP = 40
LAG_UP = 0.998
LAG_DOWN = 0.998
LAG_BRAKING = 0.98
Then just replace PIVOT_POS with your coordinates and set the variables you want to set and you are good to go 🙂
Explanation of some config variables:
- WINDMILL_DIR = react to wind in this direction (this line sets the movement mode)
- WINDMILL_DIR_EXP = adjusts how much windmill reacts to sideways wind, increase value to require more focused wind (similar to ksSpecularEXP), set to 0 to ignore wind direction
- WINDMILL_DIR_BOTH_SIDES = react to wind to both sides
- SPIN_AXIS = spin around chosen axis
- WIND_SPEED_KMH_STOP = set to non-zero to stop windmill if wind is faster, for modern generator things being disabled in storms
Both WRAP_MESHES and ANIMATED sections are mandatory! Wrap_meshes creates null for your animated object and Animated section does the rotating trick. When you are looking for the coordinates for the wrap_meshes section don’t forget that the game uses the Y axis poining up, so when you will see in 3dmax coordinates like X=10, Y=-20, Z=15 for the game engine you have to conver it according this simple rule:
X=x, Y=z, Z=-Y
so according to this rule the X=10, Y=-20, Z=15 coordinates in 3dsmax would be X=10, Y=15, Z=20 in the config file.
And last thing, for every windmill you want to rotate you should make separate configs in CSP config file with both wrap_meshes and animated sections.
Animated ferris wheel
This one is more advanced and not so easy to create, but with some basic skills in 3D modeling and animating stuff it takes only a few minutes 🙂
So to make this work you need to have 3D modeling and animating sofware like Blender or 3D Studio Max, ksEditor and some Notepad to edit config. I am using 3Dsmax so I will explain how I did it there.
- The first and the hardest step is to create the ferris wheel animation in 3D modeling program. There are various ways how to do that, you can do it from scratch, or take some model from your track or combine it, it’s up to you. I used the second option, I wanted to animate specific ferris wheel on specific track so I selected all objects I needed and exported it to separate file. Then I opened the file with just ferris wheel and moved it to 0,0,0 coordinates and rotated it to make it aligned with all axes.
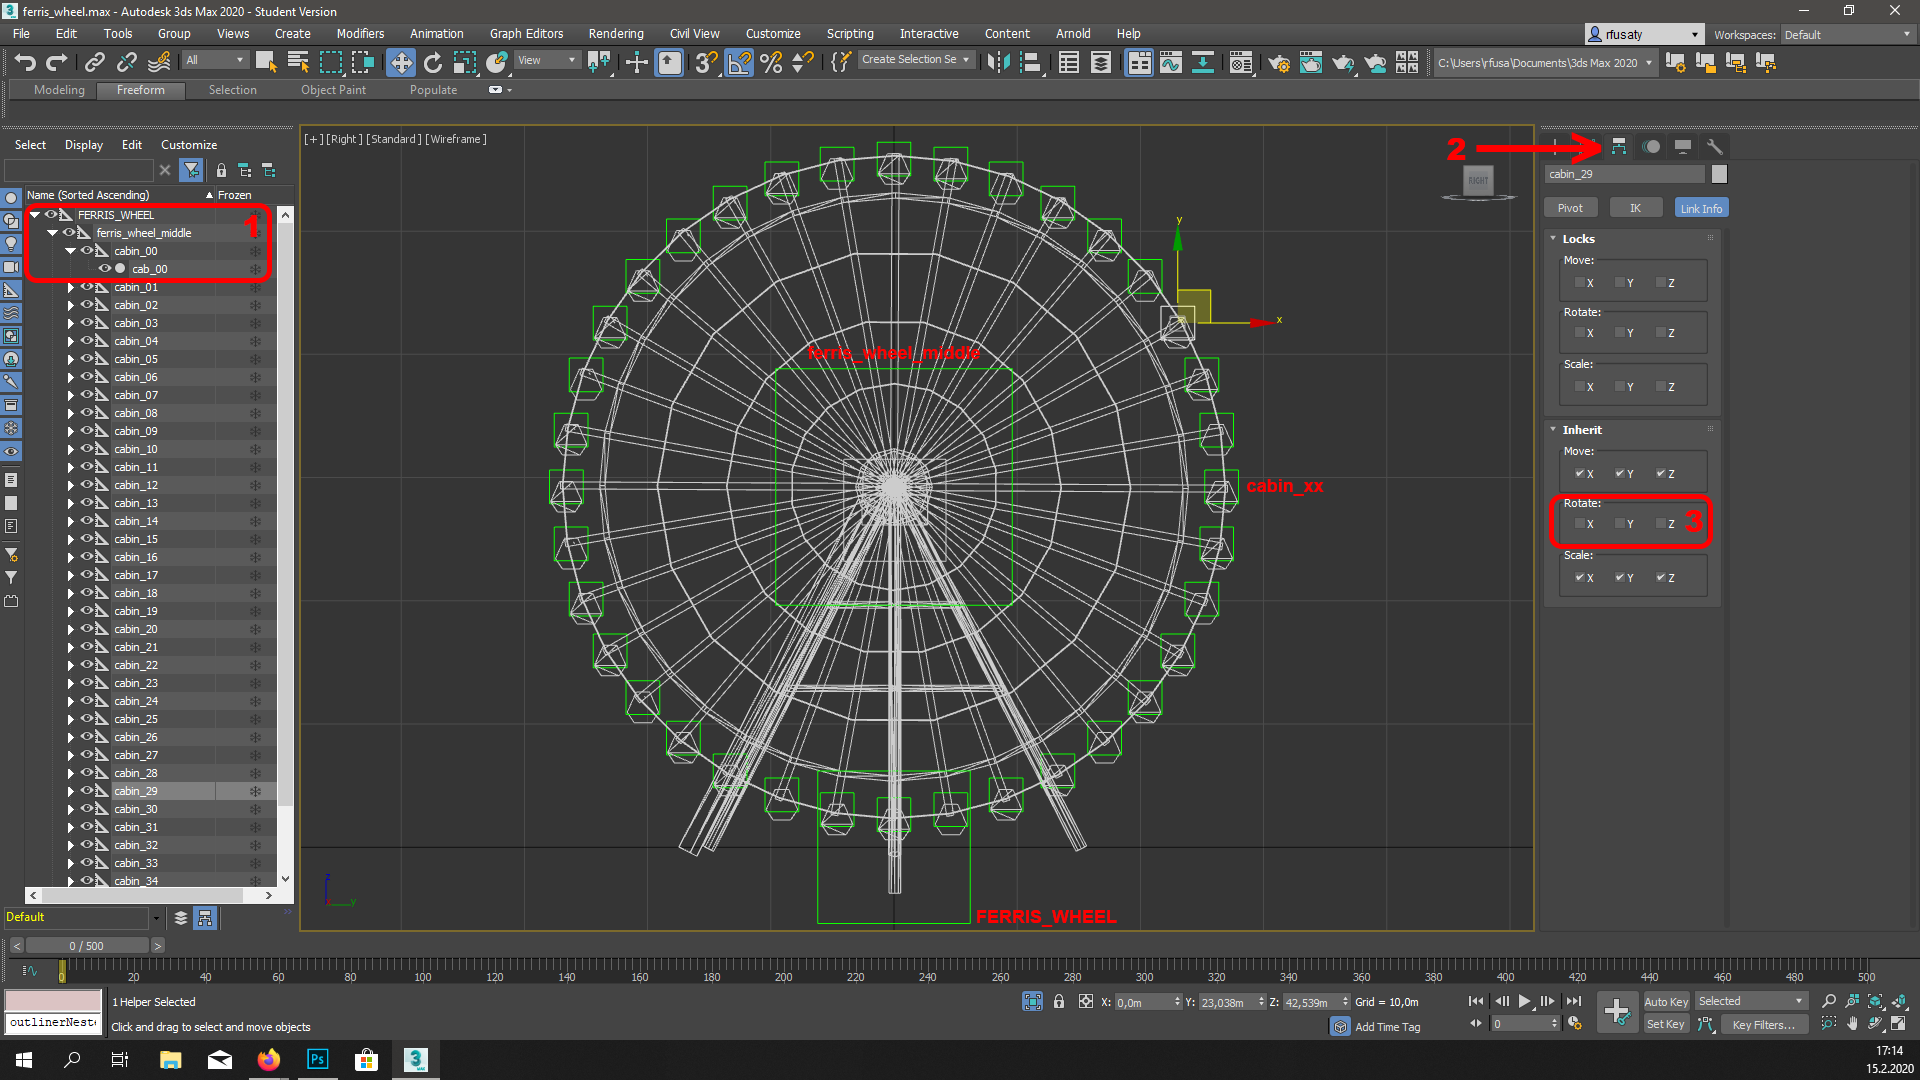
- then I created some structure with nulls, one main null called “FERRIS_WHEEL”, then one null which will be animated for rotation of the wheel and 36 smaller nulls to represent the cabs. Then I moved the nulls to the structure according to fig. 1 in Img. 1. After this I placed all mesh object to respective nulls.
- next step was to go to Hierarchy menu (fig. 2) and there I unchecked all rotation axes under Link Info – Inherit (fig. 3). This will make the cabs to point always down.
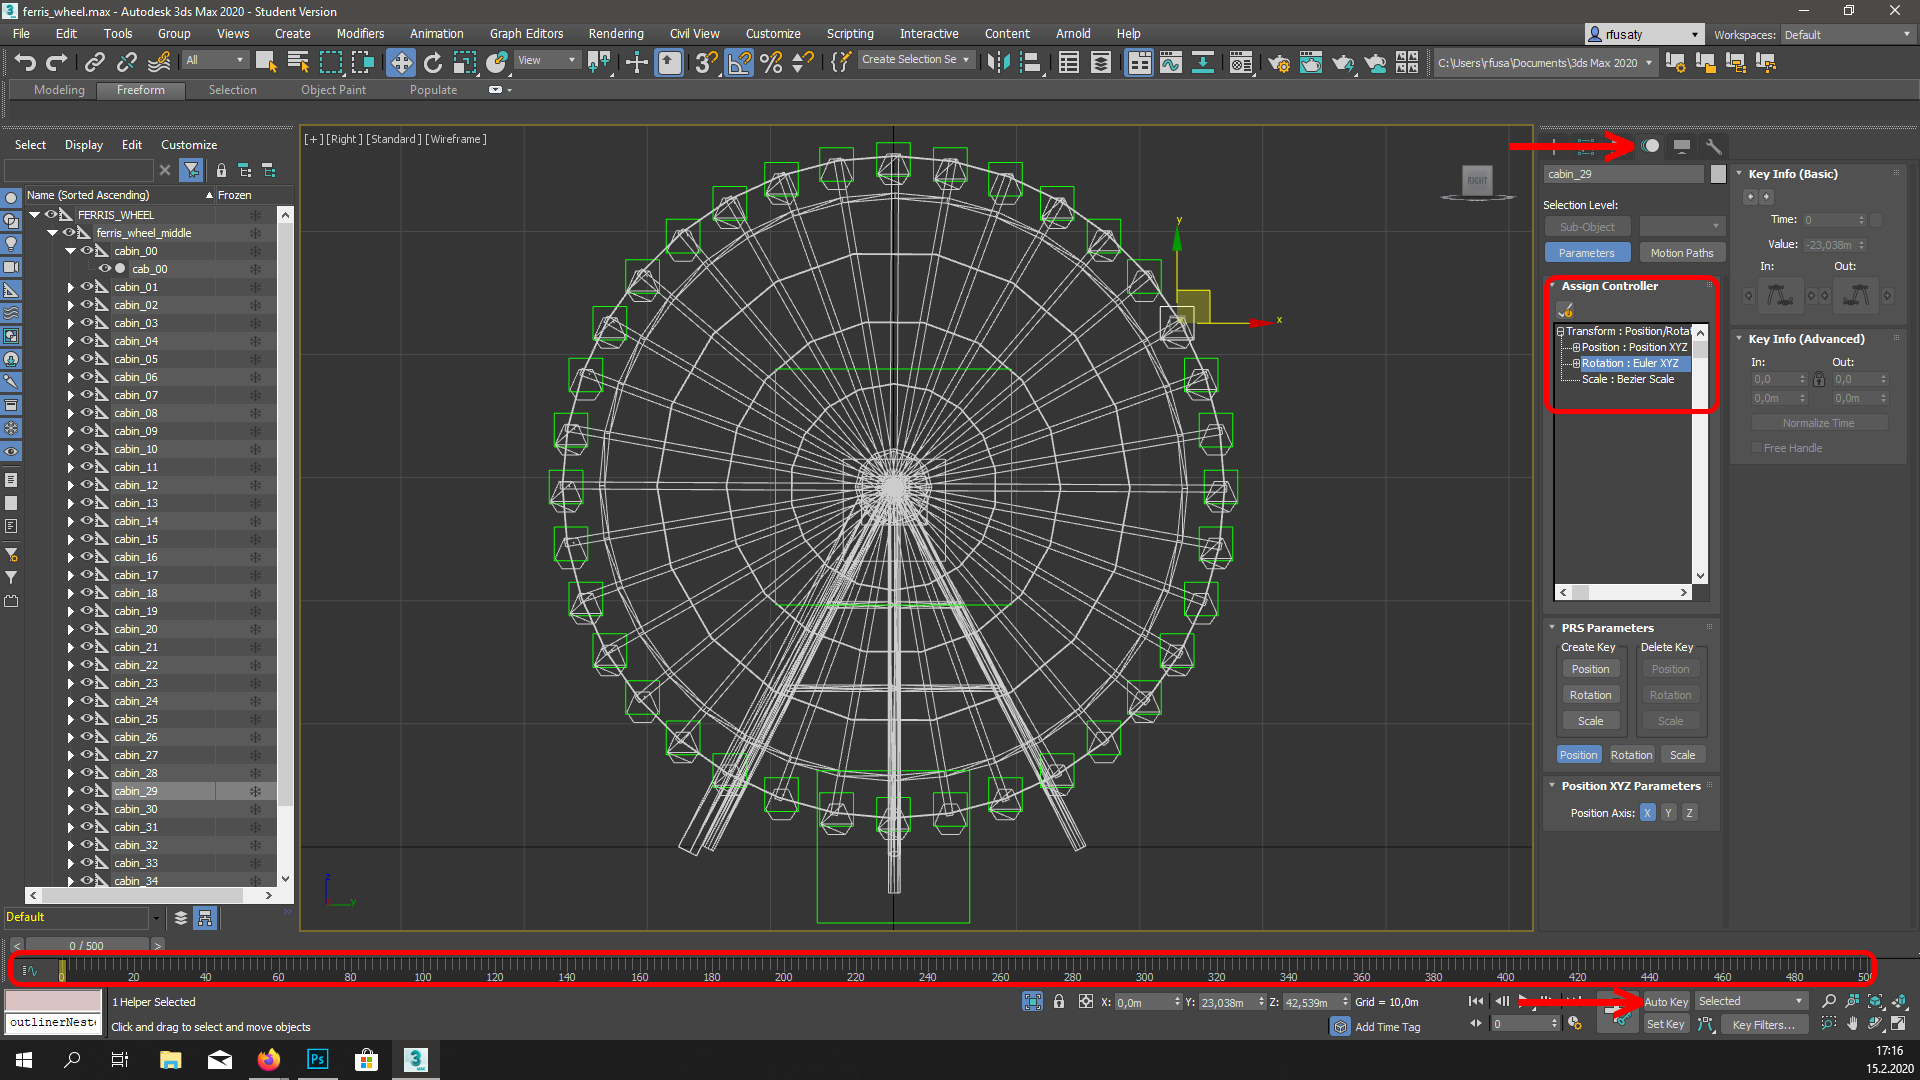
- next step was to create simple rotation animation, but there is one more thing to do, I had to go to Motion menu – Parameters and I had to assign “Euler XYZ” controller to Rotation part of the menu. This will make the animation linear. In case I would keep default setting the animation would speed up at the beginning and slow down on the end of the animation. I guess there are more ways to make the spin linear but I know this method so I used it.
- after setting all up it is time to create the animation. Move the frame slider to frame 0, click “Auto key” and move the animation slider to the middle (frame 250 in my case), rotate it 180 degrees, then move to the end and rotate the wheel another 180 degrees. This should make the wheel spin in 360 degrees and the animation should be smooth and linear. When I tried to animate 0 frame and last frame with 360 degrees the wheel was not moving at all, that was the reason I had to make one extra frame in the middle. As I said previously, there are various ways how to make the animation, so feel free to use the method you are familiar with.
- next step was to import the wheel with the animation to the track and place it to correct possition. If you will rotate it the cabs probably won’t, just select the cab nulls and rotate them manualy, it should be OK.
- when the wheel is in correct position, select the whole hierarchy under “FERRIS_WHEEL” null and export it as FBX animation, the same way as you would do with car animations. The result should be fbx file with just the ferris wheel and baked animation.
- the worst part is behind us, next step is to create ksanim file. Before we start there is one important thing to say. To make this stuff work it is necessary to to export the ferris wheel as “car KN5” file from ksEditor, not like a track, so best way is to make separate kn5 file for all animated objects.
- open the exported fbx file in ksEditor, set all materials and click File – Import FBX Animation, this will create a ksanim file in the directory where your fbx file is and you can check the animation in Animation tab in bottom part of the editor screen – Click Animation tab and move the slider to see the animation. Don’t forget to move it always to frame 0 before exporting to KN5 file! And of course export the wheel to KN5 format, but use the SAVE KN5 – CAR option
- We are almost done, next step is to put all files to correct directories – create “extension” directory in your track dir and put the ksanim file there, kn5 file with the ferris wheel to track’s root dir and add it to models.ini to load it correctly with the track, and of course put the CSP config file to “extension” directory if you have one and rename it to “ext_config.ini”
- then add this simple lines to the CSP config:
[ANIMATED_...]
NODE = FERRIS_WHEEL
ANIMATION = ferris_wheel.ksanim
DURATION = 60
And that’s it, the ferris wheel should spin, just adjust the duration value in CSP config according to the animation lenght. I made it 500 frames long, but I guess you can do the animation as long as you want. There is no limit.
So this is it, this is how I did the magic. I would like to thank all people on CSP discord who helped me with it a lot 🙂 I am no very good at making tutorials but I hope I mentioned all necessary steps to make it work, if you will have some more questions just contact me and I will help if I will be able to. 🙂
Thank you for this useful tutorial,I just managed to animate a windmill in my track.
Hi there mate, great tutorial!!
Thanks to you I did manage to get my wind turbine to rotate in the game, but there is allways a stutter on the end of the animation cycle that doesnt happen in 3DSmax.
I have seen no stutter in other AC tracks animated windturbines!
I did try multiple animation configs in 3DSmax with no luck so far, the stutter is not very noticeble when the duration of the animation is set to 1 second but that makes the blades rotate unrealisticaly fast!
Any advice?
thanks for your time and keep up the good work:)
Wind turbines won’t stutter because their animation is created by shader patch, but animations which need ksanim file to work stutter on the end and I honestly don’t know why. Maybe we should ask Ilja, shader patch creator…
Thanks for the info mate! I spent a day already trying to fix it!! you saved me some precious time:)
here’s what I did, I just exported the Kn5 to track root and updated the models.ini. Then placed the Ksanim on assettocorsa\content\tracks\xxxx\extension folder and added the lines:
[ANIMATED_…]
NODE = FERRIS_WHEEL
ANIMATION = ferris_wheel.ksanim
DURATION = 60
to the ext_config.ini file inside the same folder.
So I dont know why do we need this lines below:
[WRAP_MESHES_…]
NAME = name_of_your_node
MESHES = name_of_rotating_mesh
PIVOT_POS = -76.42, 170.709, 889.468
[ANIMATED_…]
NODE = name_of_your_node
WINDMILL_DIR = 0, 0, 1
WINDMILL_DIR_EXP = 0.5
WINDMILL_DIR_BOTH_SIDES = 1
SPIN_AXIS = 0, 0, 1
SPEED_MULT = 1
WIND_SPEED_KMH_MIN = 1
WIND_SPEED_KMH_MAX = 20
WIND_SPEED_KMH_STOP = 40
LAG_UP = 0.998
LAG_DOWN = 0.998
LAG_BRAKING = 0.98
The tutorial says: “All you need to do is to add this code to your CSP config file”,
Does it refer to the same ext_config.ini I used? I am confused cause I did get the animation to work without those lines.
Just tried it again and what I have found is that for Ksanim file method you place inside assettocorsa\content\tracks\xxxx\extension\ext_config.ini file:
[ANIMATED_…]
NODE = FERRIS_WHEEL
ANIMATION = ferris_wheel.ksanim
DURATION = 60
But for CSP method you use:
[WRAP_MESHES_…]
NAME = name_of_your_node
MESHES = name_of_rotating_mesh
PIVOT_POS = -76.42, 170.709, 889.468
[ANIMATED_…]
NODE = name_of_your_node
WINDMILL_DIR = 0, 0, 1
WINDMILL_DIR_EXP = 0.5
WINDMILL_DIR_BOTH_SIDES = 1
SPIN_AXIS = 0, 0, 1
SPEED_MULT = 1
WIND_SPEED_KMH_MIN = 1
WIND_SPEED_KMH_MAX = 20
WIND_SPEED_KMH_STOP = 40
LAG_UP = 0.998
LAG_DOWN = 0.998
LAG_BRAKING = 0.98
Just trying to sort out the rotation axis wich is now in the wrong direction in game.